Project Breakdown - juventas thermae
Introduction
Hello! This blog is dedicated to sharing my process of my most recent personal project, Juventas Thermae. I learned a bunch while creating this, and I would love to share how I created this scene.
My inspiration for this project was seeing the pictures my sister took while she was in Italy. During our brief Facetime calls, I was absolutely floored by the amazing architecture and knew I wanted to create a Roman-inspired environment as my next project. Being a woman, I wanted to dedicated this environment to be a Woman’s only bathhouse, and therefore included mainly woman deities in the relief carvings and statues.
Let’s get into it!
Gathering Reference
I started this project by researching a lot of Roman architecture and studying it. I took note of what materials, patterns, and carvings the Romans typically used. I cross-referenced my reference materials through educational databases to ensure I used images rooted in Ancient Rome.
Fun Fact: During this time, women had to pay twice as much as men to bathe.
My block out changed a few times in order to get something I was happy with. Ultimately, I wanted to create a space that had a clear focal point and an interesting visual hierarchy.
This was when I began developing a story, and asking myself questions like: What happened here? Who is living in this space? What kind of things would this person leave behind or do? Are they messy or tidy?
Early Blockout
This stage is where I begin assessing the scale. I start with the initial block out in Maya and quickly transfer that over into Unreal to address any proportional issues and ensure the modular kit snaps together. It’s a bit of a back and forth between programs, however I find it super helpful to get it into engine as soon as possible, rather than going through more of the pipeline and having to redo steps. Additionally, it helps me determine which camera angles work best, and how I can best doctor my scene.
Modular Assets
This entire environment is modular, therefore the space can be edited to have a different layout and look with these assets.
Mesh Set-up
Before exporting any static meshes to Unreal, zeroing out each mesh's pivot point is important. This is because Unreal will automatically put the pivot point at 0,0,0 even if you have previously set a different pivot point. Therefore, if the mesh is exported with a different local space pivot, the proximity of the pivot and mesh will not be accurate to each other.
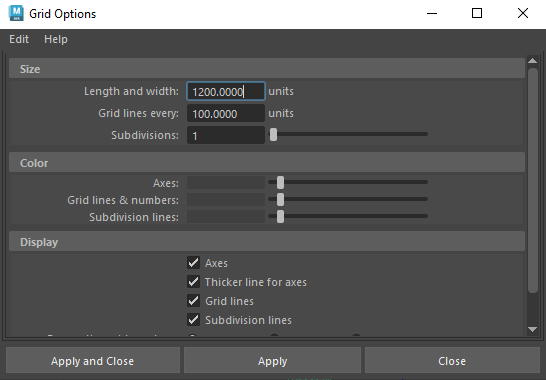
Grid settings in maya
100cm = 1 meter in Unreal
Subdivisions determine how many times grid lines are multiplied. For example: If the subdivision is set at 2 per 100cm, each space would be 50cm or .5m in Unreal. It is extremely important to snap to the grid when modeling and setting up a modular kit. This ensures there are no small gaps so other people on your team don’t have any problems.
Another good practice is always naming your mesh before exporting. Typically, meshes have the preface SM (stands for static mesh) to keep everything organized and so you can find it easily if you need to do any modifications in engine.
High Poly Sculpts - Statues
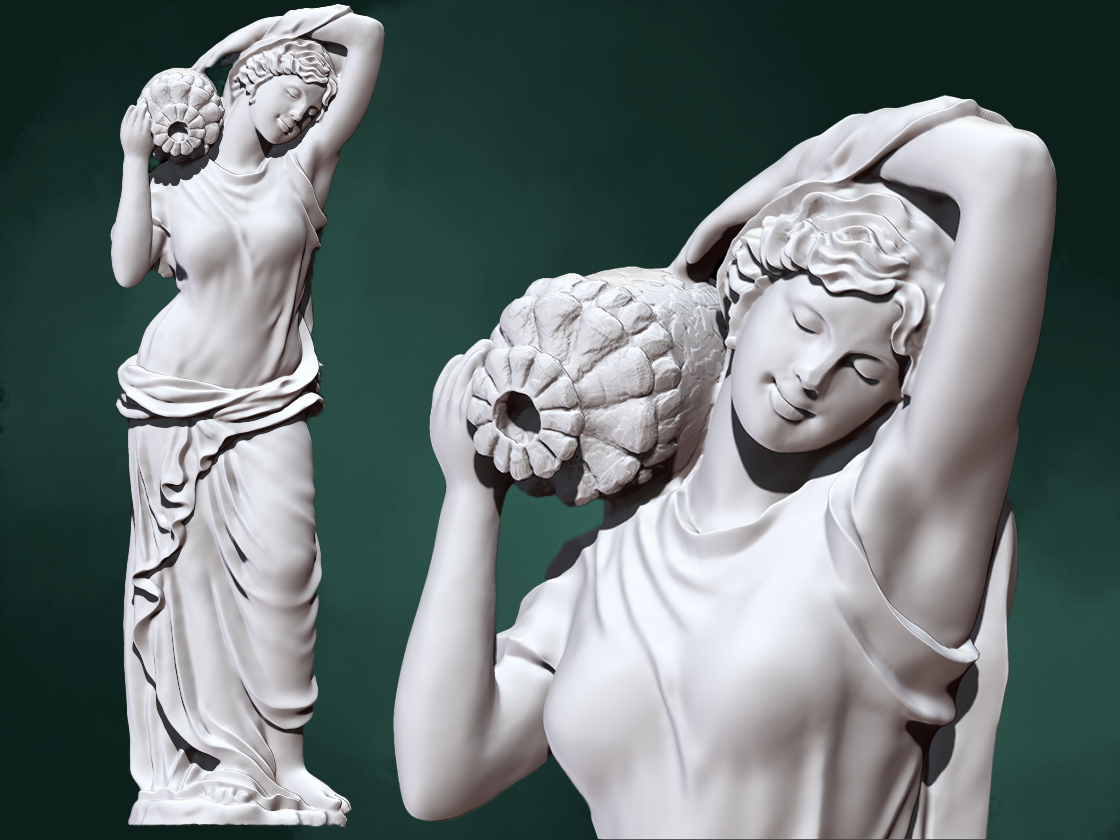
The purpose of utilizing 3D scanning was for a few reasons. The first being I wanted to have an involvement in every aspect of this project. This statue means a lot to me, my sister has the other one to match, and is by far one of my favorite decorations. I wanted to include it as a small easter egg for myself and to include it meant learning how to 3D scan.
How it started
How it ended
With this being the main focal point of the environment, I wanted to story to revolve around it. This is Juventa, the goddess of rejuvenation, and what I ended up basing the name of the environment on as well. My idea was to have the fountain and pool be symbolic to “bathing in Juventas youth and being rejuvenated by her essence.”
High Poly Sculpts - TrimSheets
Creating a detailed and ornate trimsheet was an essential part of this project. The Ancient Romans were one for details in their architecture, so I knew I needed to dedicate a lot of attention to it.
I was able to create this with a mix of poly modeling, sculpting, and hand painting depth masks in photoshop.
To create this, I watched an incredibly helpful tutorial by Rogelio Olguin. I followed his process and was able to apply it to how I made the relief carvings as well. To learn more visit: Here.
Painting a depth mask in photoshop
Step 1: Find a 2D image with a good shading range.
Step 2: Crop shaded area
Step 3: Go to filter < filter gallery < accented edges or any filter that you prefer.
Step 4: Mask and fill background layer black. Optional: feather mask so contrast isn’t as sharp in zbrush
Step 5: Duplicate and mirror image. Use offset to ensure correct tiling in both directions.
Note: I find this step extremely important in saving time. Once you confirm your pattern has no obvious seams, you can enable symmetry in ZBrush and only sculpt 1/2 of the pattern.
Step 5: Begin painting. Use the smudge and paintbrush tools to smooth out areas of inconsistency.
Note: This is the most important step. The smoother your depth mask the easier it will be to sculpt with. Additionally, be sure to have a good range of white, gray, and black in your mask.
Step 6: Final Result!!
Time for Zbrush
It is important to know when creating a depth mask for Zbrush, areas of complete black are unaffected. Therefore, when creating a depth mask that requires detail, your image must have a good mix of tones. If not, your deformation in Zbrush will be flat and not have many form changes.
Translating depth mask to Zbrush
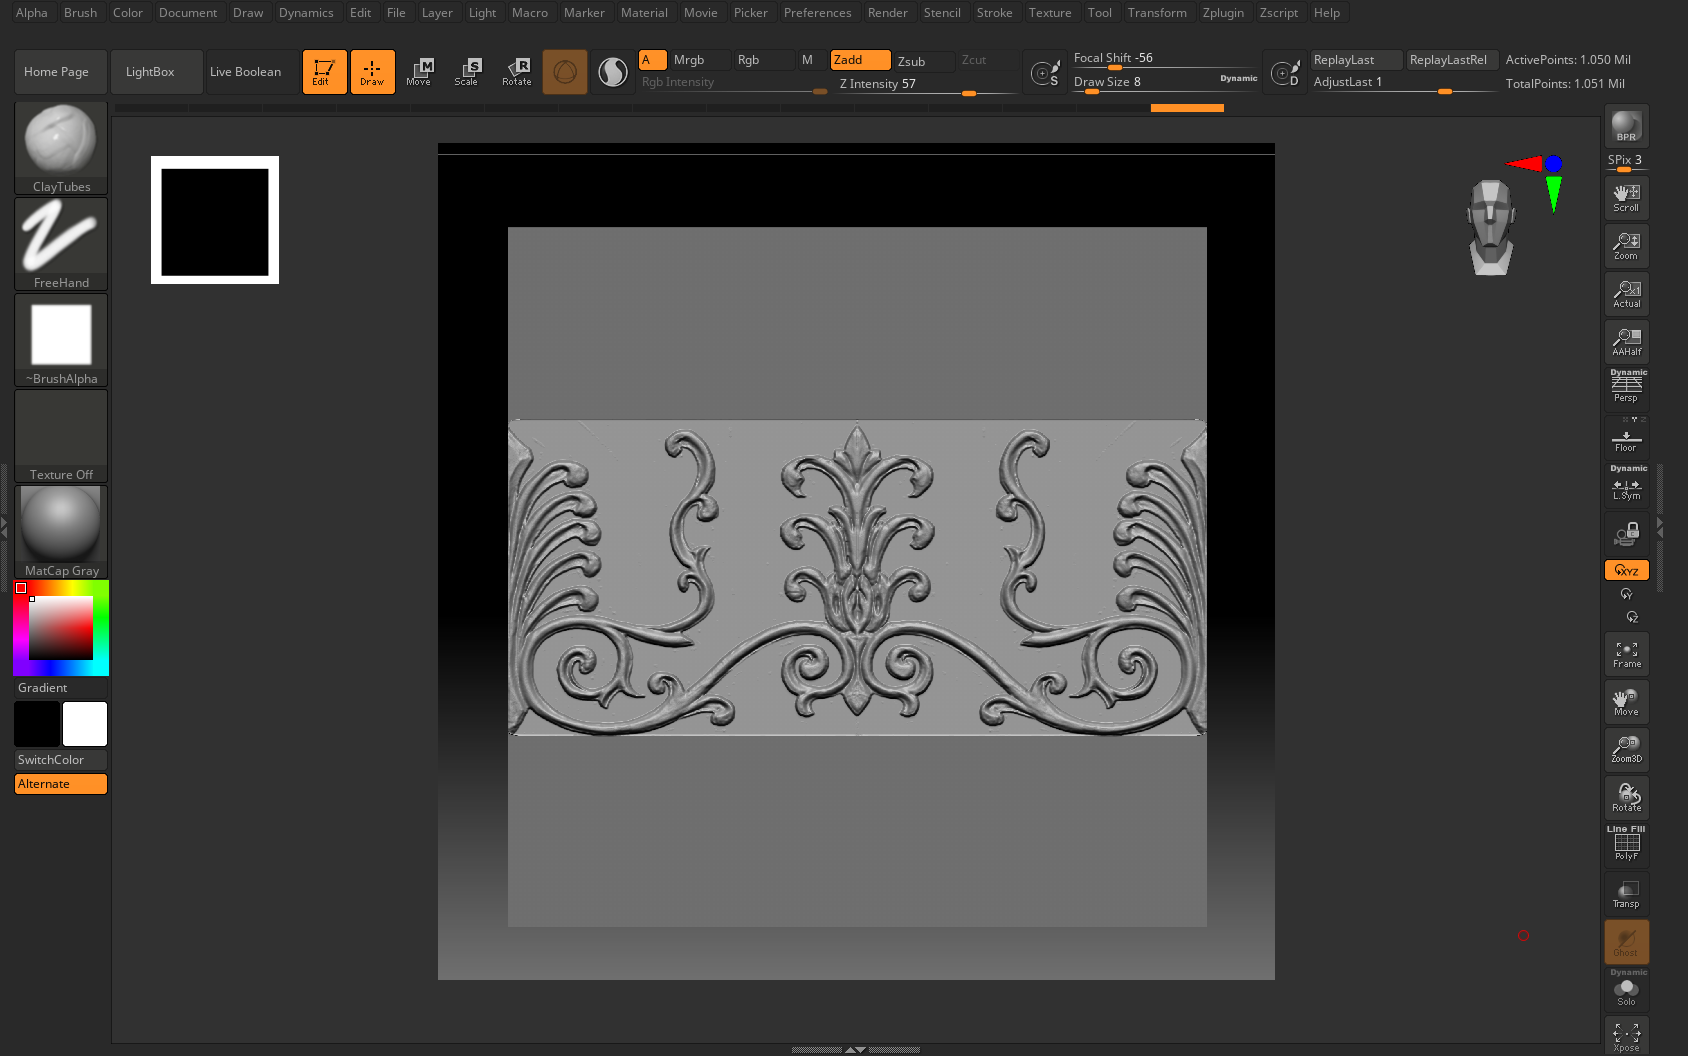
Before starting, it is important to add divisions to your plane before masking and deformation. This is because the geometry must have enough ploys to properly deform.
After importing the depth mask as an alpha, the first thing to do is mask by alpha under the masking tab.
Next, change your document size to a square format and append a regular plane. Both steps are important in setting up your trim to tile. With the plane selected, pressing f on your keyboard will frame the plane to your document size.
Under Brush settings, set the wrap mode to 1. This will allow your brush to wrap to the other side, making your trim tileable.
This is only possible when the mesh is framed to the document size and you begin painting in the margins of your mesh.
Under the deformation tab, offset the unmasked areas on the Z axis.
(or whichever axis your mesh/mask is facing)
You can also enable symmetry in areas that are not the edges of the mesh to save time.
(If your mesh is not symmetrical, see step 5 in painting depth mask in Photoshop)
Having a good depth mask is important, however you can’t stop there. Sculpting and refining the forms made from your depth mask will take your trim to the next level. For most of my trims, I mostly used DamStandard, Standard, ClayTubes, and Smooth.
Don’t forget to enable backface masking!!
This will ensure your geometry doesn’t pull inside out and create fragmented geometry while sculpting.
Before
After
Since doing this process can rack up poly count, the first thing to prepare your mesh for baking is optimizing your mesh. First, pre-process your trimsheet. With high poly count meshes, I prefer to do each one separately, so I can control how much gets decimated on every piece and ensures I don’t lose too much detail. After pre-processing is done, next is to decimate. Once that happens, I assess if too much detail was lost, or if it still needs optimization. For this example, around 210k polys was a perfect number for both saving as much detail and what my computer can overall handle.
Lastly, scale and offset the mesh so it tiles, and check for any inconsistencies or obvious seams. For trimsheets, it is best to stay away from adding larger details such as surface damage. This allows the trim to be more versatile in your environment and avoids any obvious repetition.
I extend the trims past the 1x1 frame plane to help during baking. It helps avoid any Ambient Occlusion or curvature errors.
Trimsheet baking
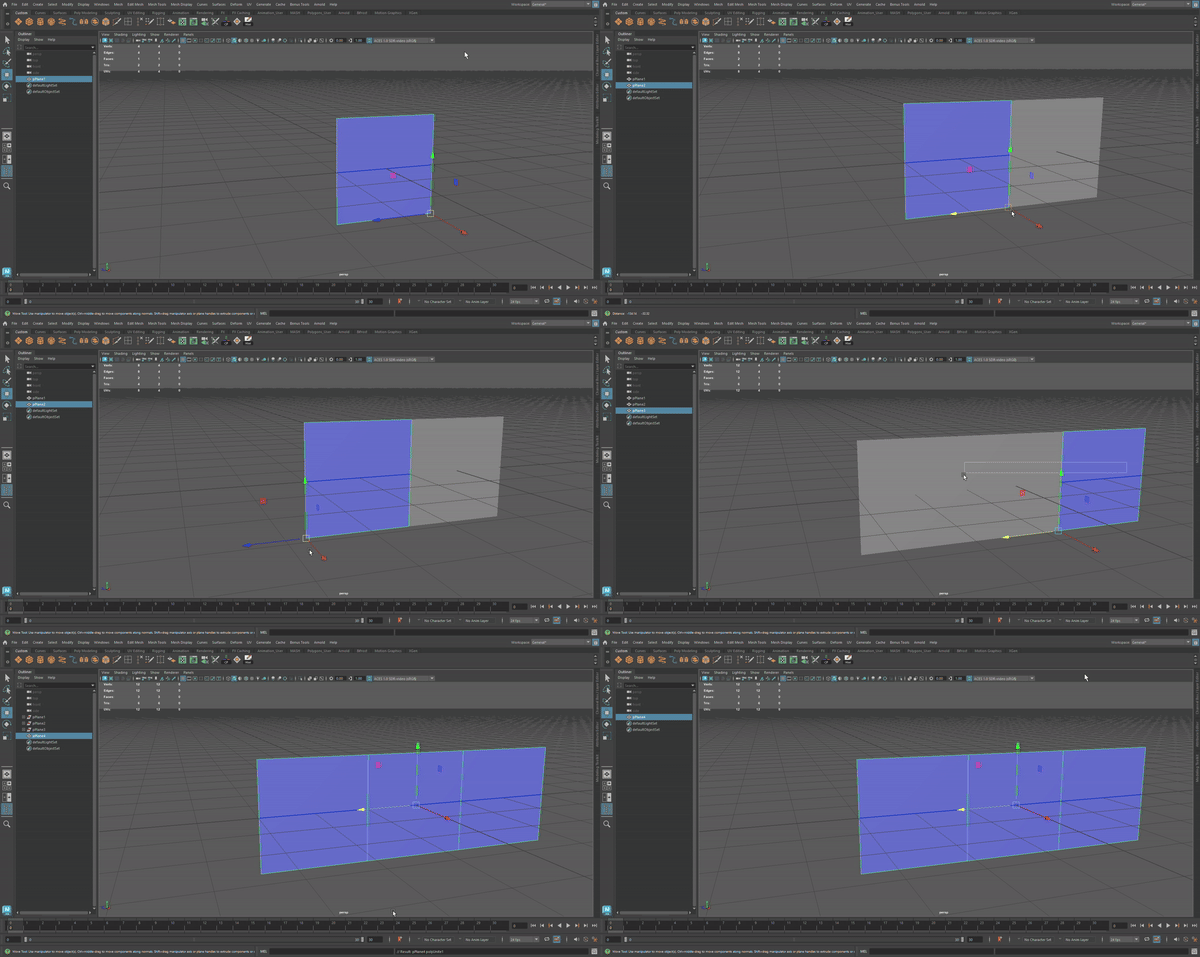
In Maya, I duplicate 3 planes for my low poly. This is what the high poly will be baked onto in Substance Painter
The 3 planes have the same UVS, so therefore will have the same bake. I create 3 for 2 reasons: The first being it is easier to see any tiling problems during texturing and after the bake. Second is to avoid any Ambient Occlusion errors. This is also why I extend the trims past the original 1x1 frame square in ZBrush.
In Substance Painter, I begin by first setting my output size the same as ZBrush, 2048x2048. After importing the high poly, I then check the bake cage. It is extremely important to make sure your cage is large enough to encapsulate the high poly. If it isn’t, there will be missing details.
Thanks to Substance’s handy new update, the cage is now visible, and you can see if your high poly is clipping outside of the cage.
UV Layouts - adjusting shells
After deciding on which areas to add the trims, I begin by straightening shells and adjusting the UVS so there is no visible stretching. Sometimes when straightening shells, they can become distorted, therefore I adjust areas by hand when needed.
UV Layouts - finding what works best
I like to try different sections of the trim for some areas to see what would look best. Sometimes different trims look better in spots I didn’t originally plan, so sometimes it’s a nice surprise!
High Poly Sculpts - Relief Carvings Atlas
To create the reliefs I went through a similar pipeline as I did for the trimsheet. Only this time, I referenced real Ancient Roman carvings. Being a woman’s bathhouse, I wanted the carvings to reflect goddesses and their importance in Roman Mythology. All the carvings shown are related to the Roman goddess, Diana and her 6 nymphs.
I sourced my images from a few different online databases for clear pictures, and went through a bit of trial and error. The wall I kept hitting was getting images that were clear enough to use and wouldn’t be too difficult to create a height map from. I found that using images that had little shadows in them yielded the best results.
Relief carvings - Reference Images
Why this doesn’t work
Dark shadows
Too much Contrast
Low Quality
Noisy Background
Why this does work
No Shadows
Clear details
High Quality
Plain background
Relief carvings - Depth Mask
When translated to a depth mask, a good reference picture maintains all of its details. With a good mix of tones, when translated to 3D, it will retain convex and concave areas. Below are some more examples of depth masks I created to make the reliefs. Disclaimer: Again, a depth mask is only half of the process, and for them to pop you have to do extra sculpting.
Relief carvings - UV Set up
Unlike trimsheets, atlases are not meant to tile but still provides the same versatility and effectiveness.
An atlas is a cost-effective way to add variation to a scene while still having minimal amounts of materials.
For this method to be effective, each UV shell has to be around the same ratio as the texture so there is no distortion. I intentionally picked out similar-sized photos to the pieces I previously modeled, so some planning is necessary beforehand.
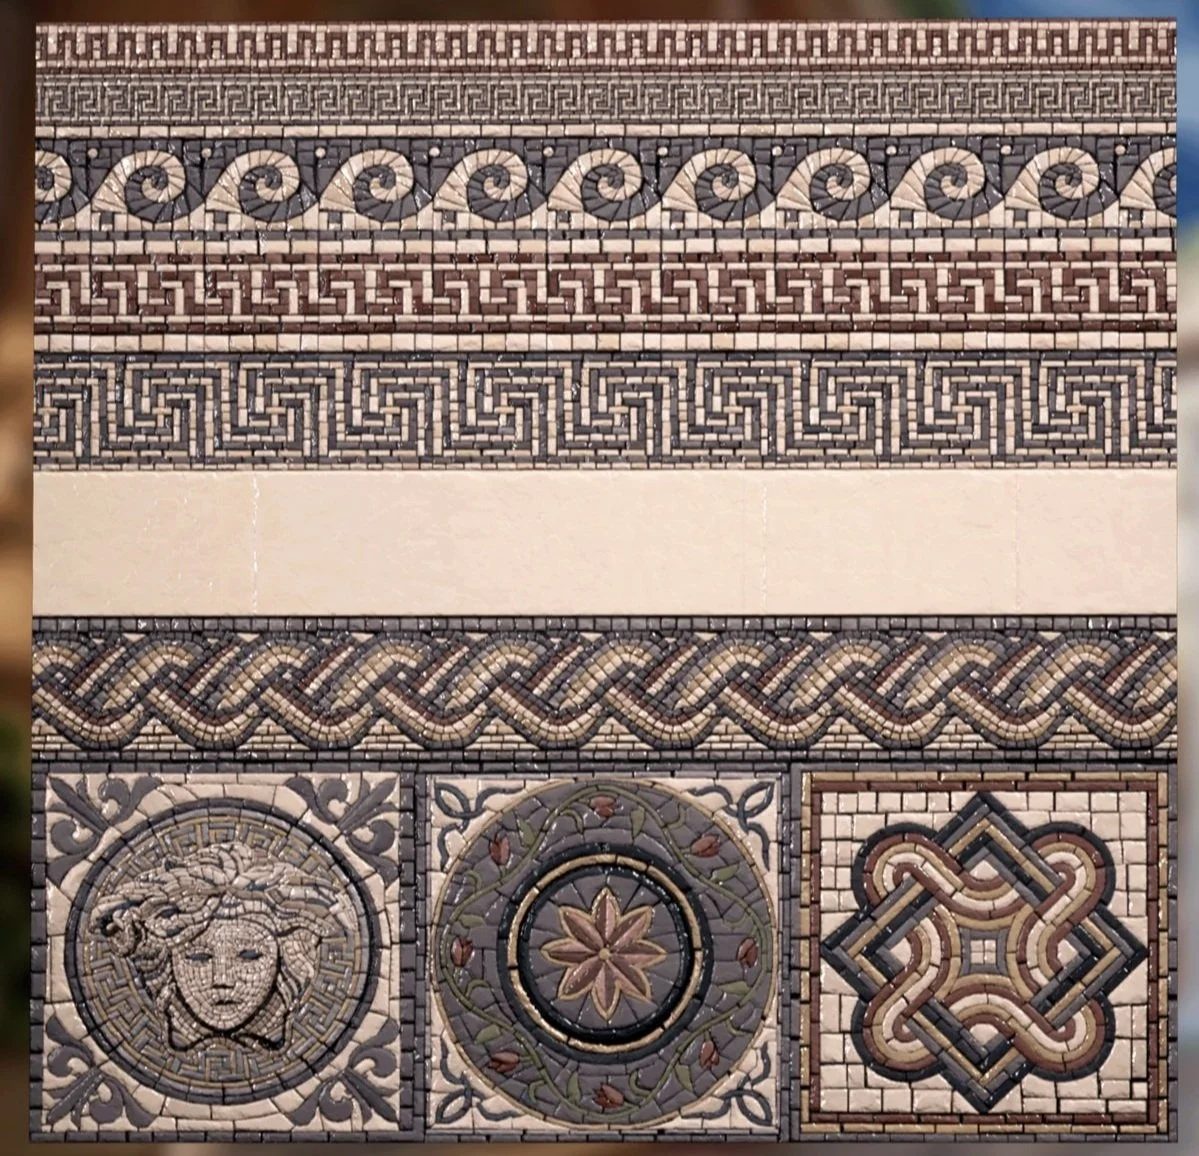
Texturing - Mosaics
I created the mosaics completely in substance designer. To start, I laid out the patterns I wanted to use in Photoshop and began drawing out them out in Designer. I used an SVG node to replicate the pattern so it tiled (except for the larger bottom squares), which saved time. Instead of doing each strip one at a time, I only had to do 1/4 of each one.
I used a bunch of references when creating these and picked out patterns that reflected the emotion of the scene and also made sense in context.
Mosaics - Vertex painting
Material Set-up in Unreal Engine
For most of the materials, I set up material instances that have multiple editable parameters. This helps me quickly make adaptations to materials and allows me to see those edits in real time.
Almost all of the material instances I set up contain a custom color tint, normal intensity, roughness intensity, and fresnel intensity parameters. More complex shaders have different parameters added.
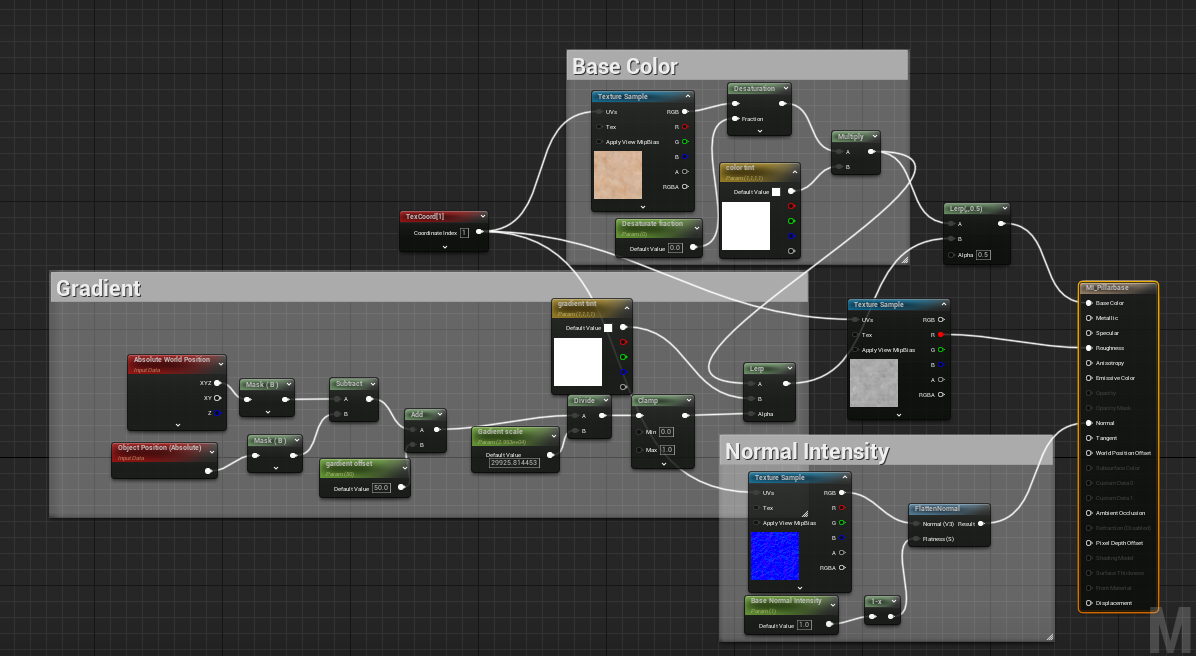
For the pillars, walls, and niche, I used a slight object gradient that gets darker at the bottom. This made the assets more visually interesting and subtly push the viewer’s attention to a focal point.
Material graph of how I blend an object position gradient and additional parameters
Material Set-up: Water
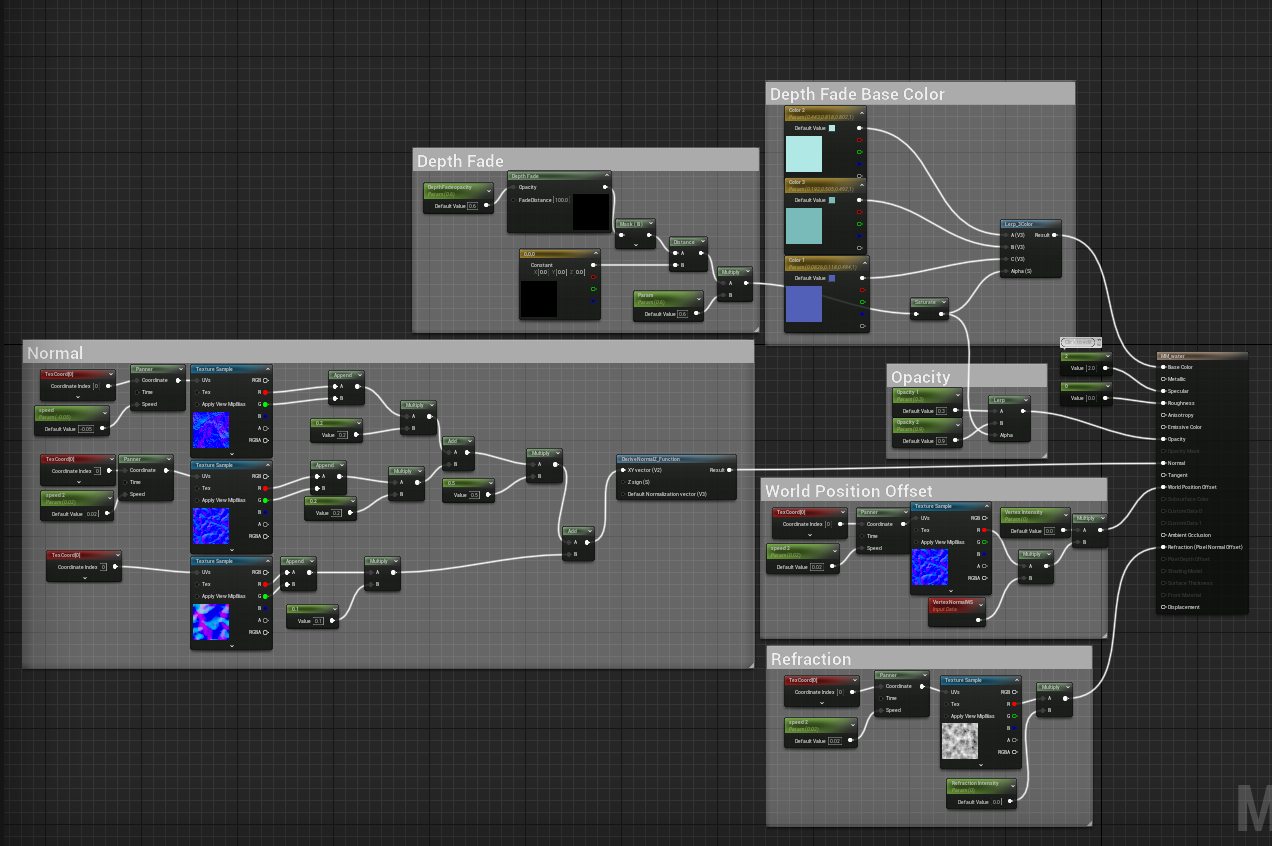
The water is a simple plane with a few divisions with a vertex offset and depth fade. Since the water is relatively shallow, I included 2 layers of opacity, setting the top layer higher than the bottom. This creates a layered effect, and gives the water a bit of depth.
Material graph: All attributes are set up as material instances. I edited these parameters to fit how I wanted it to look and what was most realistic.
Caustics
With World Position
Without World Position
The caustics is a decal with a material instance applied, that has a world position mask meant to tile the textures on every axis. Usually, decals only apply their textures to which direction it is facing, which can cause them to stretch and deform. The example on the right is a demonstration of this. Therefore when I created the material, I masked the x, y and z axis to allow the texture to also be projected each way.
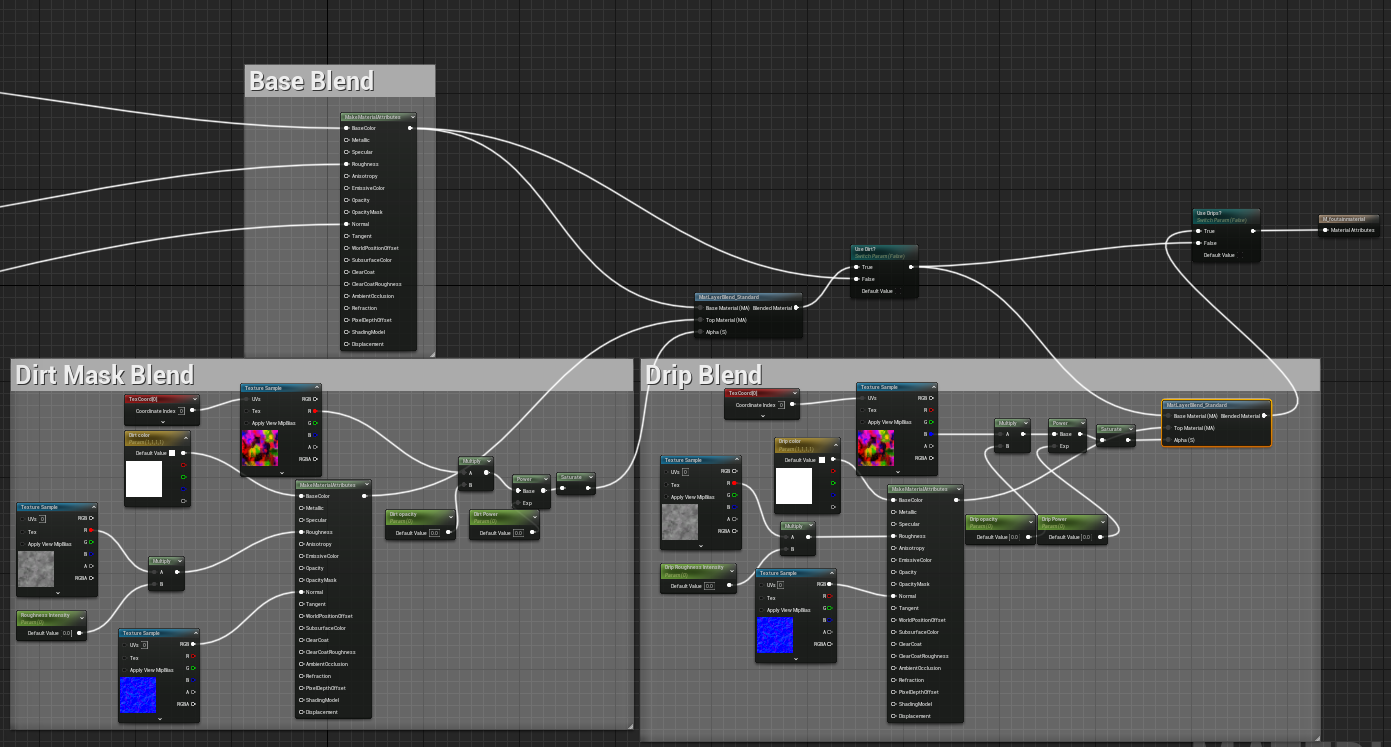
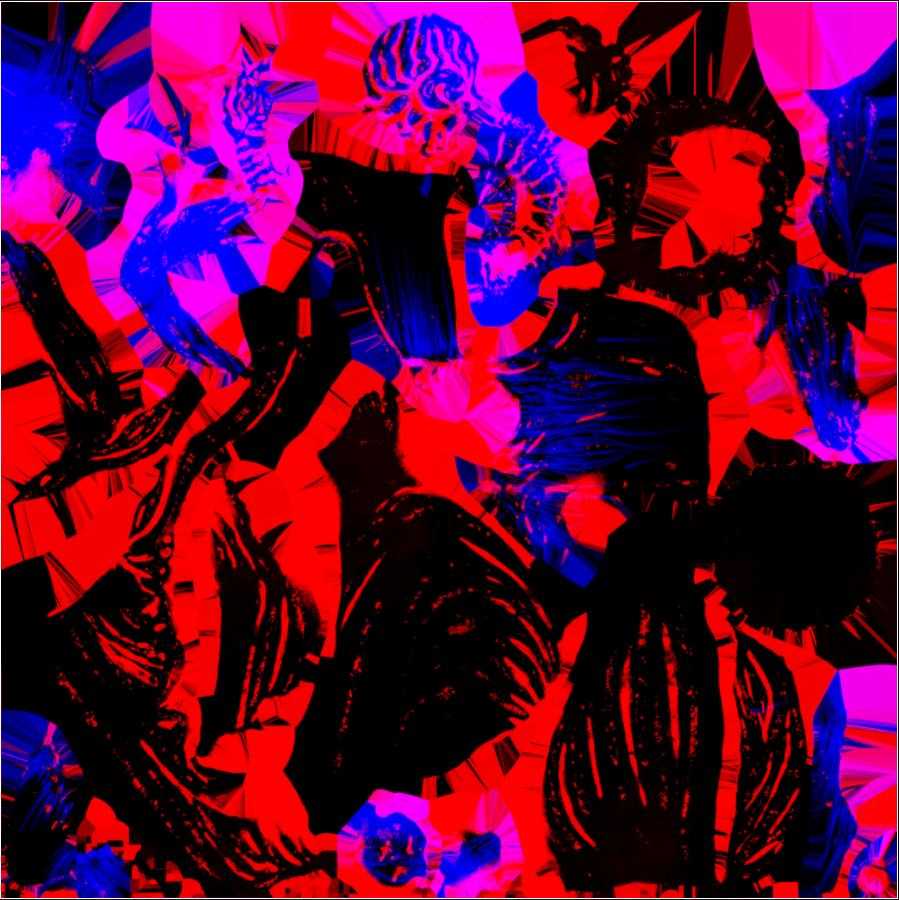
As I began to add some detailing to my materials, I created a special mask for the main statue. In substance painter, I created a red and blue mask for dirt and extra weathering. With this mask, I created a material instance that contained 2 switches for each mask.
RGB Masking
When creating my mask I thought about where/how this asset would get damaged. Since the statue is outside, I primarily added the blue mask to the top, which the weather and sun would wear on the concrete in real life. The red mask is concave areas and is primarily where dirt would build up.
red and blue mask
Lighting
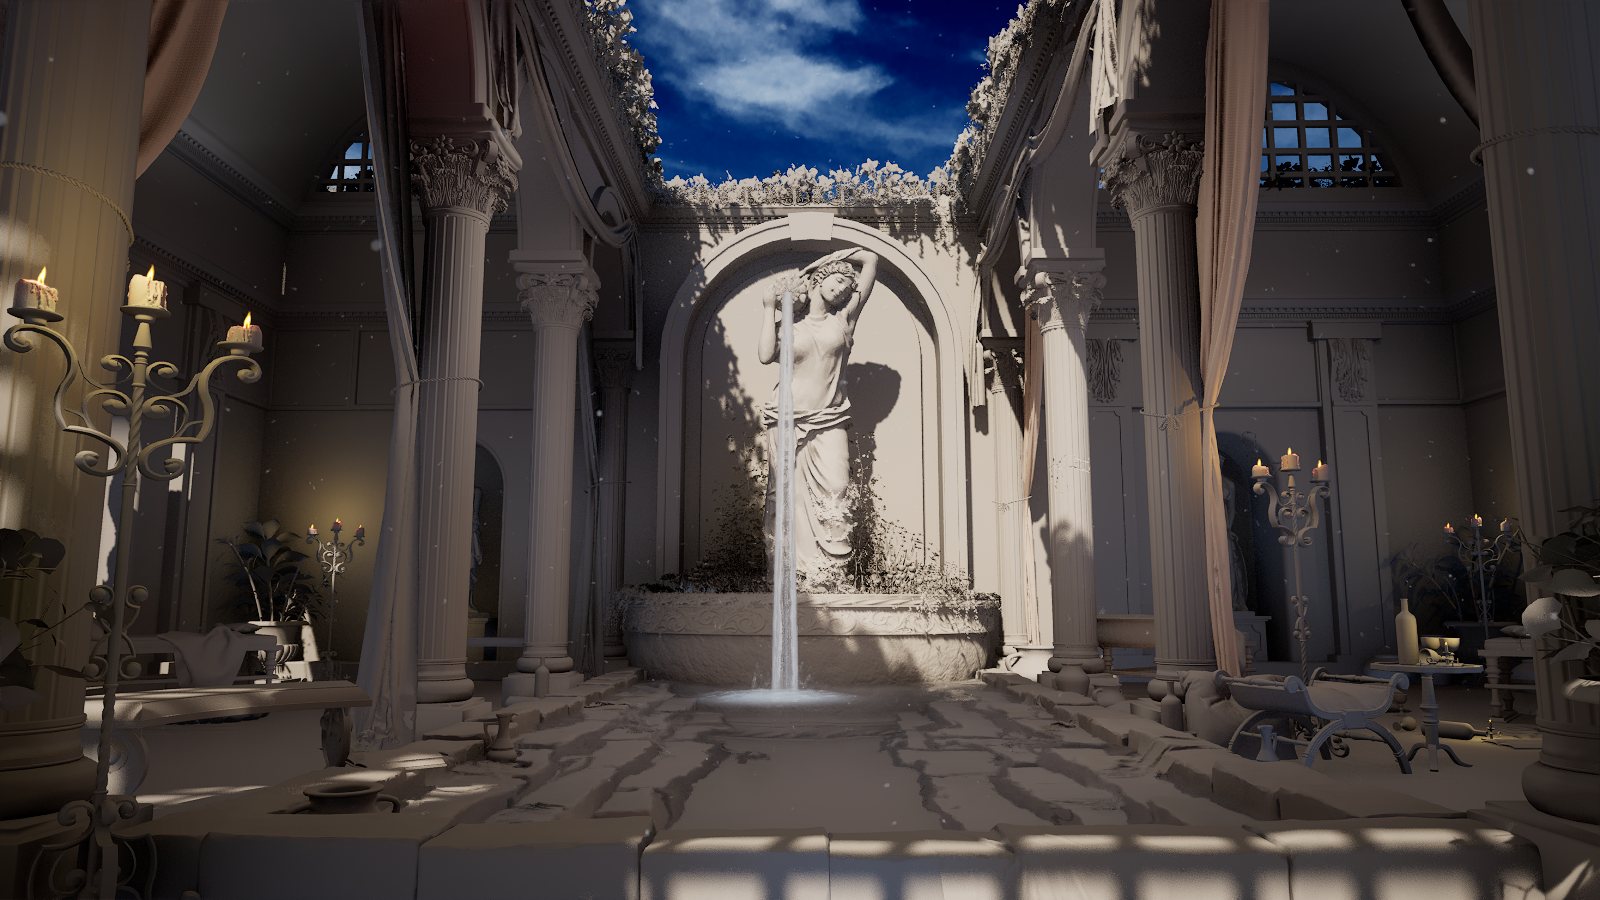
Lighting is an extremely important set in the design process when considering environment art. Not only does it establish mood, but it also can be used as a form of storytelling. I like to consider how to lead the viewer’s eye will bounce around the scene and guide them to focal points. I typically find it easier to see how effective the lighting is by going into a lighting view mode.
Before I begin on detailed lighting, I typically solidify the main lighting source when I first bring the scene into Unreal during the block out stages. I do this to tailor the scene and get a general gist of what the end product will be.
Since this is mostly an interior scene, I increase the value of the indirect light source. This will evenly light most areas, however in specific areas it does not, I typically add additional lights. In this instance, the upper arcs were not popping as I would like, so I added 2 spot lights.
Post Processing is one of the last steps I tend to do before rendering. This is typically because I like to use it as an enhancement, such as doing light color grading or increasing shadow contrast that can be done through lighting.
Post Process
This scene had a lot of warm tones, so to combat this a bit I added a slight temperature change.
Rendering
When it comes to rendering, I use the Movie Render Queue. Since it is a plugin that is not on by default, I enable it and then restart the engine.
After this, I add a level sequencer and apply the camera I set up to it. To ensure the camera stays where I need it to, I keyframe all transforms. Next, I set up settings such as anti-aliasing and console variables to denoise the scene and produce clean renders.
Anti-Aliasing
Having a high subsampling count of 64 will help improve render quality by reducing noise and providing clean renders. However, having a higher temporal sample count does mean it takes longer to render each frame, so just be mindful to not make this a crazy number off the bat.
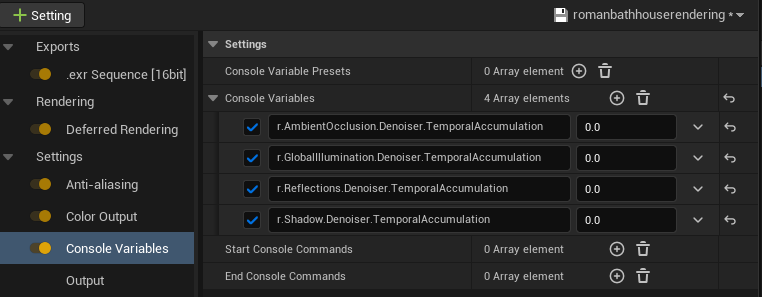
Console Variables also improve quality. After adding this tab, adding these commands will take your render to the next step.
Note: when coping each command, do not add the number. The number is set in the next slot over to the right.
r.AmbientOcclusion.Denoiser.TemporalAccumulation 0
r.GlobalIllumination.Denoiser.TemporalAccumulation 0
r.Reflections.Denoiser.TemporalAccumulation 0
r.Shadow.Denoiser.TemporalAccumulation 0
Console Variables
After this step is completed, you are ready to render!
Conclusion
Thanks For Reading!
Overall, I had a blast creating this project. It taught me so much about the design process and gave me the confidence to complete a larger-scale environment from start to finish. With this project, I wanted to demonstrate the culmination of the knowledge and skills I gained throughout the years into one piece. I am so grateful to see just how much I have learned technically and creatively from this project!
“Continuous progress is better than delayed perfection.” -Mark Twain


